Deleted
Deleted Member
Posts: 0
|
Post by Deleted on Dec 14, 2018 17:16:50 GMT
Another local trick was getting airborne over the hump that used to be on the road between Whittlebury and Silverstone. I guess that has gone since the A43 got moved. Ex Whittlebury resident. It’s a long time since I used to drive/ride those roads regularly- that road from Whittlebury to Silverstone was a right bumpy bastard at speed for it’s full length : ) I used to cut through Whittlebury going to and from Silverstone to my mates place up Blackmire Lane, was a much more interesting journey cutting across To Salcey Forest, Yardley Chase and the back of Poddington than roaring down the A45/43 Oo long time ago....lived in Deanshanger before that. Yes it was bumpy a friend at the time worked for Suzuki and as we were off to Weston I asked to drive his brand new Swift..... we flew down that road. Another good one was the straight between the A413 and Shanger except its not straight there is one major bend in it, again it was flat out and then see who could take the most speed through the bend. Do you remember the bends at Cuttle mill on the A5? Its straight now but they were dangerous more than one biker died there. Same as the bends in the dip between Deanshanger and Buckingham I was taken sideways through there in a traffic car in the Shanger days. |
|
Deleted
Deleted Member
Posts: 0
|
Post by Deleted on Dec 15, 2018 11:17:26 GMT
My best mate grew up in Old Stratford, his old man still lives there. all those roads became our stamping ground when we turned 16  I am sure that bit of the A5 has been straight for the getting close to 25 years I’ve been on the road, in the early days I’d try and avoid the A5 at all costs - even having an AR80 that would sit at 50mph quite happily it wasn’t the best bit of roads to use - That changed with the advent of a full licence! I remember riding to Mallory Park one Boxing Day on my XL125 - it was so cold I had frost forming on my jacket - had no energy or will to attack the back roads so sat for mile after mile on the A45, A43 and A5, what a crap journey that was. I’d missed my lift in a car with my friends from Towcester, Imhad been out on the lanes round Santa Pod on Christmas Day morning, I had picked up a slow puncture that went flat on the way to Towcester, by the time I had changed the tube they had given up on me and gone ahead - this was ‘96 so no mobile phones between us. The racing wasn’t great, circuit was slippery as hell - particularly at the hairpin! The things you do as a kid! |
|
Deleted
Deleted Member
Posts: 0
|
Post by Deleted on Dec 15, 2018 13:44:35 GMT
Yes you are right about the A5 it was longer ago than that. It used to be 3 lanes all the way up, suicide lane in the middle you had to hold your nerve when overtaking. I remember one day being at work in central London called wife to say I was leaving work to be told I had an hour to get back to Shanger as she was going out and I was babysitting, made it with 5 mins to spare........  |
|
|
|
Post by phil70 on Dec 15, 2018 16:38:28 GMT
If you want bumpy roads try the Fens Foxy will testify to the wonderful road called the Prickwillow road,
Phil
|
|
Deleted
Deleted Member
Posts: 0
|
Post by Deleted on Dec 15, 2018 18:52:28 GMT
If you want bumpy roads try the Fens Foxy will testify to the wonderful road called the Prickwillow road, Phil The one from Upware to Reach is pretty rough - in fact I have ridden smoother motocross tracks 👍🏻😜 |
|
Deleted
Deleted Member
Posts: 0
|
Post by Deleted on Dec 20, 2018 20:30:00 GMT
Definitely no updates until the New Year - I purposely left the turbo at work so I couldn’t b tempted to do anything over the hols!
|
|
Deleted
Deleted Member
Posts: 0
|
Post by Deleted on Jan 4, 2019 17:35:30 GMT
Well, it’s the New Year! Here it is:- totally finished, sat on my living room floor waiting to be delivered to the boat this weekend.  I have added a 1/8” npt port to the water injection elbow - you can see it on the underside of the stainless elbow on the right. This was done for two reasons: 1 = monitor exhaust temperatures while I’m setting the boost pressure 2 = provide a port for an exhaust temperature alarm, the proprietary kits pierce the flexible exhaust hose to get a probe into the stream of gasses/water - I don’t like this method so took the opportunity to do a proper job. Once I know the normal operating temperature I’ll get an alarm together - I’ll probably do it with just a buzzer that sounds at a set over temperature point. We’ve never had an issue where a blocked intake has wrecked the impeller but as this was an ideal time to incorporate an alarm I’d be daft not to put the little bit of extra effort in now. I’m short of 1 exhaust gas temperature probe (winging its way from China as we speak) - I’m using a 4 channel k type data logging temperature recorder; the 4 channels being:- Ch 1 - Intercooler charge air in Ch 2 - Intercooler charge air out (the air that is delivered to the inlet manifold) Ch 3 - Exhaust Gas Temperature at the manifold outlet into the turbine housing - this is the important one to get right as too high an EGT will lead to a poorly BMC CH 4 - Exhaust gas temperature at the water injection elbow - see above. Ch 1 and 2 are simply k type thermocouple wire twisted together and held against the Intercooler pipe work with 2” jubilee clips - I fitted them last week and they read spot on. I want to see how efficient the Intercooler is and to make sure the charge air leaving the turbo is at safe levels. These thermocouples will be removed when trials are finished as they do not need constantly monitoring Ch 3 will be tested both on the river and with a bollard pull to see where the EGT peaks, as long as the boost and EGT is safe I won’t need to monitor it so it will have a taper plug in the port. The port occupied by Ch 4 is the only one that will be monitored once everything is set up - as above! I am also waiting on a 1” stainless hydraulic elbow fitting for the water injection connection - this should arrive next week. Rough plan is this weekend strip out the old exhaust injection elbow, drill and fit exhaust outlet, mount turbo and start on the oil and fuel lines. It’s going to be pretty fluid how things go and how much time I can devote to it (as normal!) but we are getting closer 👍🏻👌🍻 |
|
Deleted
Deleted Member
Posts: 0
|
Post by Deleted on Jan 4, 2019 18:30:01 GMT
You could hang that on a wall as a work of art.
No idea what the hell it is but I' m really impressed.
Rog
|
|
Deleted
Deleted Member
Posts: 0
|
Post by Deleted on Jan 4, 2019 18:40:43 GMT
You could hang that on a wall as a work of art. No idea what the hell it is but I' m really impressed. Rog The red plug bit is where the hot exhaust gasses enter the turbo and drive the turbine wheel - imagine a trick water wheel; this turbine drives a compressor wheel, air for which enters through the stainless tube connected to the blue hose. once it’s squeezed the incoming air it’s sent on its way to the engine via the black right angle hose - squeezing the air means we can cram more into the engine, boosting the amount of fuel it can burn and upping power and torque - along with making a nice little whistling noise in the process 😜👍 spent exhaust gasses exit out the shiny stainless bit on the right and are mixed with the engine raw water after it has done its work cooling the engine. I think my boss is glad the incriminating evidence has now left my office 🙈 |
|
Deleted
Deleted Member
Posts: 0
|
Post by Deleted on Jan 10, 2019 23:02:11 GMT
8pm finish tonight - it's on and almost done. Left to do:- WRAP MANIFOLD AND DRY ELBOW. MAKE STEADY FOR TURBO. EXHAUST - INSTAL SYSTEM. I'm waiting on the 60mm hose to be delivered by mouse next week. I'll grab some photos of it installed on Saturday afternoon, it was dark and I was too knackered to do it tonight. After that it's river trials 🛥️🍻👍🔨🔨 |
|
|
|
Post by peterboat on Jan 10, 2019 23:12:03 GMT
8pm finish tonight - it's on and almost done. Left to do:- WRAP MANIFOLD AND DRY ELBOW. MAKE STEADY FOR TURBO. EXHAUST - INSTAL SYSTEM. I'm waiting on the 60mm hose to be delivered by mouse next week. I'll grab some photos of it installed on Saturday afternoon, it was dark and I was too knackered to do it tonight. After that it's river trials 🛥️🍻👍🔨🔨 Good luck with the river trials hope it does what you want it to |
|
Deleted
Deleted Member
Posts: 0
|
Post by Deleted on Jan 11, 2019 9:07:29 GMT
8pm finish tonight - it's on and almost done. Left to do:- WRAP MANIFOLD AND DRY ELBOW. MAKE STEADY FOR TURBO. EXHAUST - INSTAL SYSTEM. I'm waiting on the 60mm hose to be delivered by mouse next week. I'll grab some photos of it installed on Saturday afternoon, it was dark and I was too knackered to do it tonight. After that it's river trials 🛥️🍻👍🔨🔨 Good luck with the river trials hope it does what you want it to Ta! It is all going together well - 7 P's and all that |
|
Deleted
Deleted Member
Posts: 0
|
Post by Deleted on Jan 13, 2019 16:13:06 GMT
So here are the pictures -taken in failing light I’m afraid General overview - you can see the oil catch can from the rocker cover breather screwed to the deck bearer at the top of the picture - this was a worthwhile addition in its own right  Oil feed from Pressure sensor port 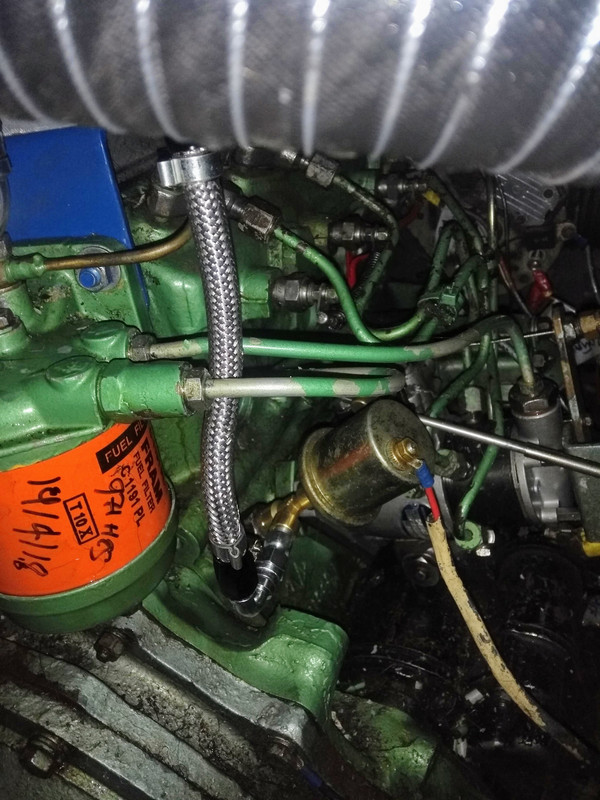 Feindishly expensive oil pressure regulator- this maintains a max 40psi supply to the turbo, it could be subjected to 80psi cold and 60 psi hot, the dirty solution to keeping turbo oil feed pressure down is to fit a restrictor in the oil feed, everything about that is poor practice - I’d rather the expense of the the Ozzie reg and know it’s getting a good supply at a sensible pressure - the excess oil runs into the rear tappet cover beneath the exhaust manifold.  In this shot you can see the turbo oil drain - large braided hose centre of the photo to the left of the coolant bypass gate valve. This is the biggest pain in the arse on the installation - due to the close proximity of the Intercooler I can’t get a pair of 32mm spanner’s on the 3/4 hose union to tighten it up where the hose wants to lay - still, for every problem there is a solution - I shall machine a pair of gas regulator spanner’s to 32mm, short and good enough to pull up the fittings that are a gravity drain under no pressure.   The green wires are the thermocouples to measure air in/out on the Intercooler. The blue 6mm tubing is the take off to the boost gauge - this will measure the boost at the manifold rather than at the turbo compressor, this is a bonus as it means I can account for loses through the Intercooler, the turbo is capable of around 16-18psi max boost depending on who you believe - I am hoping I only need 5-7 psi at the manifold so it should work well within its capabilities. Left to do is fit the exhaust thermocouples (i’m Still waiting for one to arrive from China 🇨🇳) and fit the exhaust silencers/ hose along with the 25mm raw water hose from the heat exchanger to the exhaust wet elbow. The turbo steady is actually going to come off a bellhousing bolt, I shall use a turnbuckle just to make life easy. Once I’ve run it and am happy with it all I will fit the exhaust wrap (thanks @loddon 👍🍻) and the turbo jacket. |
|
|
|
Post by phil70 on Jan 14, 2019 8:10:45 GMT
Ref turbo oil drain and getting spanners on it. This reminded me of a "spanner" we had to make for BA Systems. Somebody had designed a part that had to be retained by cap screws inside a slot!!!!
The solution was to make a sort of Allen key with a body containing a chain of miniature gears inside and a had drive at each end, twiddle the hex at one end sent the applied motion through the gears to the hex at the other end. IIRC the slot was probably about 12mm so too narrow for a regular or cut down Allen key.
The gears were too small for us to cut so I took the drawings and toddled of to Clerkenwell where I used to go with my father, a watchmaker, to buy all his repair materials.
The first place I went to was able to cut the miniature gears, their comment was "piece of piss"
So thanks to a watchmaker the day was saved.
Phil
|
|
Deleted
Deleted Member
Posts: 0
|
Post by Deleted on Jan 14, 2019 21:41:57 GMT
Ref turbo oil drain and getting spanners on it. This reminded me of a "spanner" we had to make for BA Systems. Somebody had designed a part that had to be retained by cap screws inside a slot!!!! The solution was to make a sort of Allen key with a body containing a chain of miniature gears inside and a had drive at each end, twiddle the hex at one end sent the applied motion through the gears to the hex at the other end. IIRC the slot was probably about 12mm so too narrow for a regular or cut down Allen key. The gears were too small for us to cut so I took the drawings and toddled of to Clerkenwell where I used to go with my father, a watchmaker, to buy all his repair materials. The first place I went to was able to cut the miniature gears, their comment was "piece of piss" So thanks to a watchmaker the day was saved. Phil The somebody who designed the inaccessible SHCS should have been made to build and dismantle the assembly several times without your nifty gadget, a hard lesson learnt is a lesson never forgotten I’ve had no end of jobs were I’d have liked to have had words with the idiot sat in front of a drawing board or computer screen - it wouldn’t have been a pleasant conversation about the weather or Northampton Saints up and down form.... 🤬🔨🔨🔨🔨🤦🏼♂️ |
|