Deleted
Deleted Member
Posts: 0
|
Post by Deleted on Dec 4, 2017 9:13:12 GMT
Vanguards bill of materials is complete, just waiting on the pump and injectors now, no rush as the only date available to put her back together is the 30th of this month! I have knocked this up to make life easier getting twat bolt back in - Vic at Diesel care services gave me the heads up on this   It's no end easier than fighting with a hex head bolt, bit of cunning and dexterity and you can get at it round the underneath of the exhaust manifold. For Fairlight I have made this strainer from a bit of 2" schedule 40 pipe, just waiting on a 1" BSP union so i can fit it to the outlet side of the seacock and get the final position of the outlet elbow to connect to the existing 22mm raw water pipework. The RJT flange will be cut off and a 25mm to 22mm silicone hose reducer used to connect the the pipework together. 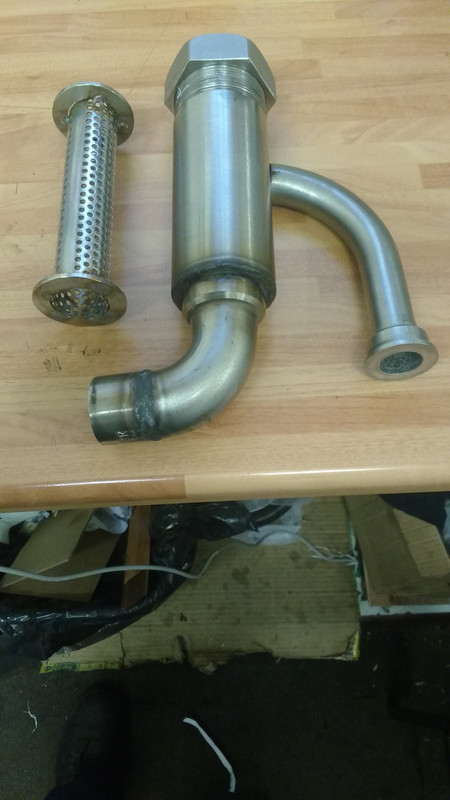 This will allow me to shut the seacock and introduce antifreeze into the raw water circuit - the seacock is after the strainer in the original set up meaning I currently have to pull the pipework to bits to drain it down for frost protection. |
|
Deleted
Deleted Member
Posts: 0
|
Post by Deleted on Dec 4, 2017 9:15:04 GMT
Well, last night the Hurricane boiler suddenly started to make a funny noise and then stopped, all power to the system gone! Oh fuck, just what we need before Christmas. Anyway, phoned the helpful chaps at Calcutt boats (European distributors) with a view to getting their service engineer out, only to find that due to long term sickness one wasn't available until January. They then suggested that the most common cause for a main fuse blow would be the compressor, most likely the brushes. A new compressor is £266 so I needed to know it was the problem. Three screws , two electrical connections and a hose clip and it was off. I hooked it directly to a 12v power source and the motor ran ok so it wasn't the brushes so time to check the diaphragm housing. Took this to bits and found metal shards and the screw that holds the diaphragm to the cam had pulled through the centre plate of the unit and obviously jammed, leading to a current spike and the blown fuse, so phoned Calcutt back to be told that this would be the cause and a new diaphragm could be with me Tuesday for £34 including postage....result, much cheaper and only half an hour to do the repair. Result! Two Hundred and Thirty odd sheets kept in your back pocket is always a good thing |
|
Deleted
Deleted Member
Posts: 0
|
Post by Deleted on Dec 13, 2017 9:12:09 GMT
The strainer is done!  I nipped over yesterday to fit the union to the seacock so I could get an accurate postilion for the outlet elbow. quick blat with the TIG set and a lick of pickling paste and it's all good to go back on. I'm glad i did go over as the raw water pipes were not fully drained, both the gearbox and engine oil coolers had water in them, they should have been OK with open ends but it was a chance I wouldn't want to take. This setup now means antifreeze can be pumped round the system cutting my work load down some more |
|
|
|
Post by larkboy on Dec 13, 2017 19:17:40 GMT
The strainer is done!  I nipped over yesterday to fit the union to the seacock so I could get an accurate postilion for the outlet elbow. quick blat with the TIG set and a lick of pickling paste and it's all good to go back on. I'm glad i did go over as the raw water pipes were not fully drained, both the gearbox and engine oil coolers had water in them, they should have been OK with open ends but it was a chance I wouldn't want to take. This setup now means antifreeze can be pumped round the system cutting my work load down some more That's a proper job Gazza, you can't beat a nice bit of stainless tig pipe welding. I've been welding mainly Ali recently, which I do love welding. |
|
Deleted
Deleted Member
Posts: 0
|
Post by Deleted on Dec 17, 2017 18:27:52 GMT
Strainer fitted:- 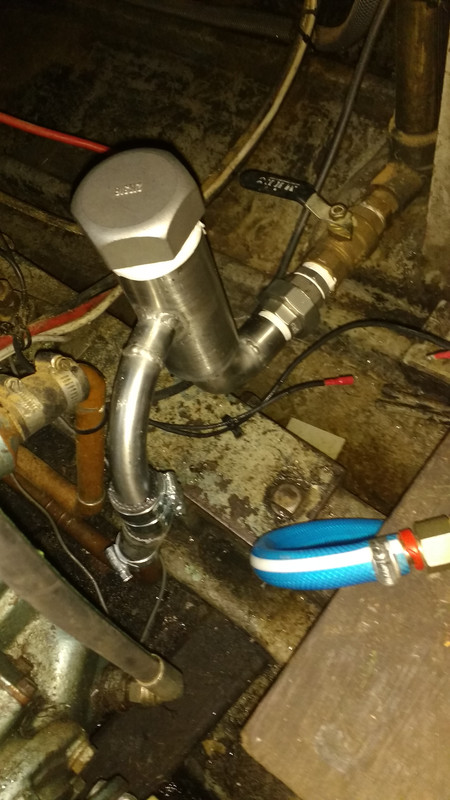 Bilge fairy is still MIA.. I've reconnected the pipework and ran the engine up with antifreeze, takes about a gallon go get right round the system. Well pleased with the result. I can now open the valve. Go cruising in the winter, comeback, shut valve, unscrew the cap and flush it with antifreeze - an exercise that takes 5 minutes tops 🚢⚓🍻 |
|
Deleted
Deleted Member
Posts: 0
|
Post by Deleted on Dec 17, 2017 18:39:25 GMT
Northern Star now had her rudder amd helm fitted:-   All that remains with the steering is to connect the cable, make some rudder stops and lock the wheel up in the dead ahead position - hence why the wheel hub screw and cap has been left out at the moment. We've been busy rattling hole saws though the bottom and sides of her too 😵 The raw water intake needed relocating to a more accessible place - requiring a 1" skin fitting, seacock and new strainer fitting. This has freed up the old raw water intake and strainer for the flush water to a sea toilet that is to be fitted. The bog requires an outlet seacock fitting so Friday will see a 1 1/2" hole saw going through the bottom of the boat so we can fit a shiny new Blake's seacock. As in my setup a diverter valve is going in so it can go to a holding tank should the need arise. We have also lowered the exhaust outlet so a new lower helm floor canbe made up, this will make it all one level and free up a bit of space in the cockpit. The exhaust outlet is now on the waterline so will give that nice quite exhaust but the added spice of another sinking risk! More photos on Friday.... |
|
Deleted
Deleted Member
Posts: 0
|
Post by Deleted on Dec 23, 2017 20:01:35 GMT
New 1" raw water engine cooling seacock and strainer - we were forced to mount it there due to an overlap on the hull layup. The header tank is shifting over a couple of inches to make access to rod it out a little easier.  Toilet seacock- again, the position of stringers and an overlap on the layup meant the valve sort of positioned itself. 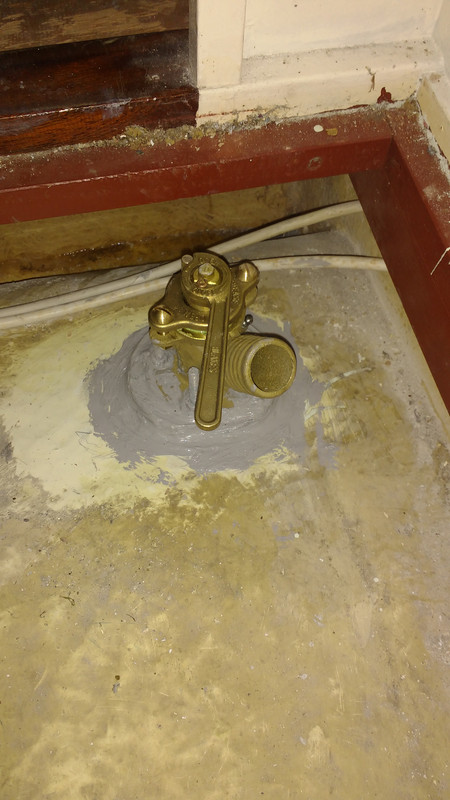 Copious amounts of sikaflex were used on both seacocks and skin fittings. Repositioned exhaust and floor bearer along with helm and newly fitted steering cable. 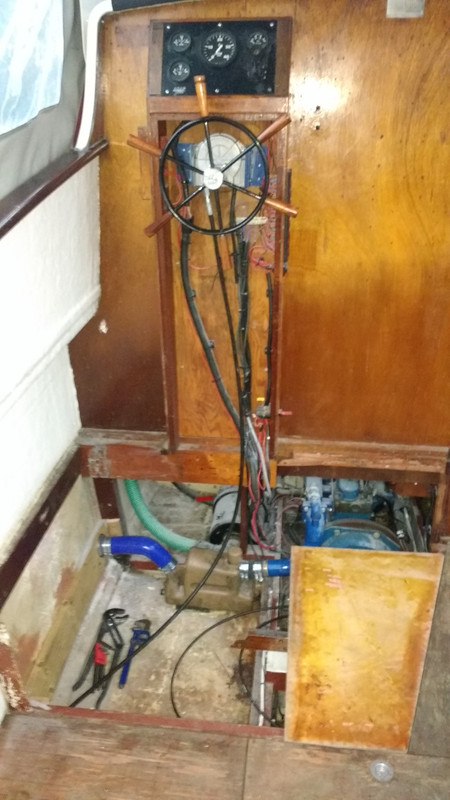 The steering cable connected at the rudder end. The transom swivel mount is going to get gusseted when I get back to work as it flexes a little more than I'd like on full port lock. Thankfully the amount of stroke is enough to take the rudder to 45° and no more so I don't need to make lock stops. 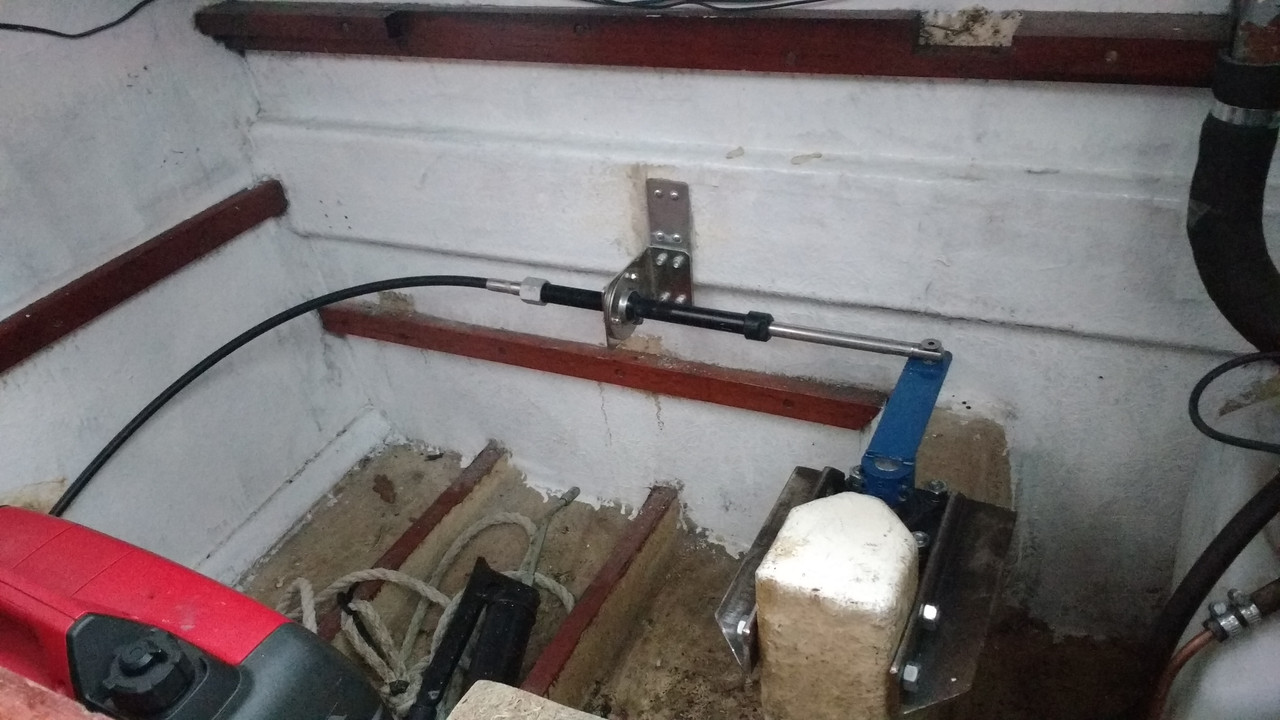 |
|
Deleted
Deleted Member
Posts: 0
|
Post by Deleted on Jan 2, 2018 13:36:02 GMT
Quick update on Vanguard.
Everything is back on the engine, fuel system rebuilt with new spin on filter in place of the old 296 element.
The improved strainer is finished,
We rewired the patented Perkins Thermostart intake bonfire which works beautifully and also ran in a new starter solenoid switch wire.
Unfortunately I ran out of time and light to bleed her and get her burst into life, so it is round 2 this weekend.
|
|
Deleted
Deleted Member
Posts: 0
|
Post by Deleted on Jan 4, 2018 19:07:18 GMT
Everyone must love a shiny new gusset or two.  Steering now complete 🚢⚓👍 Just to make sure I don't get bored I have an enclosure to sort for the single lever side mount Volvo Penta engine control lever that is being relocated on Northern Star. The fun never stops! |
|
Deleted
Deleted Member
Posts: 0
|
Post by Deleted on Jan 5, 2018 20:38:39 GMT
After a lot of scratching around looking for something that would house the teleflex 700ss Volvo control lever I came up with this. 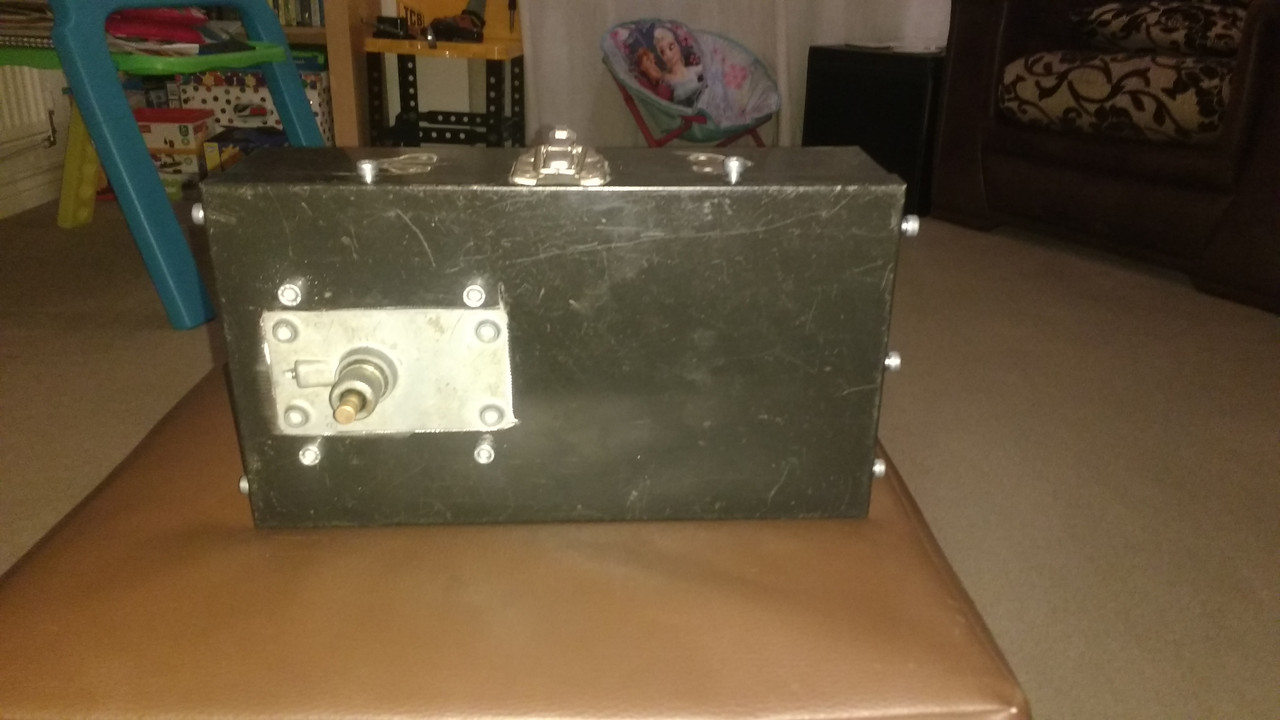 In a former life it housed a little airbrush kit. The catch has for the time being been retained. It doesn't really need to be there as I have welded M5 captive nuts on the inside to stiffen it up. I'll let my mate decide if he wants the catch or not. It will be mounted vertically with the control cables exiting the bottom of the enclosure. 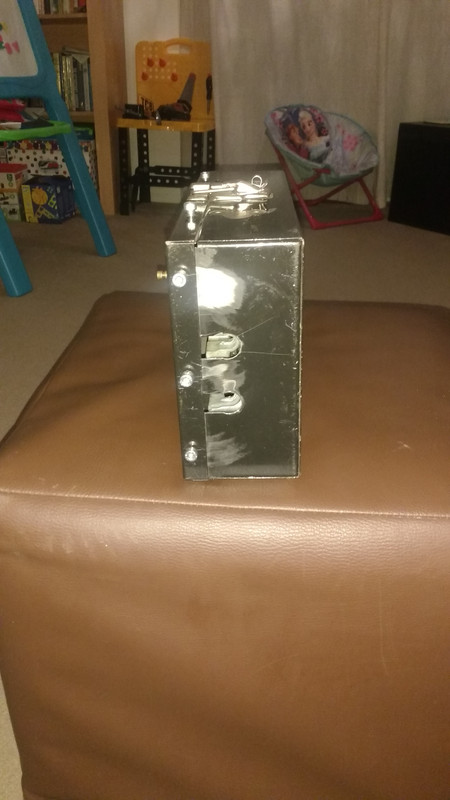 The lid hinge will allow it to be swung open to change the cables without having to remove it from the cockpit combing to dismantle it. A lick of paint and the fitting of the lever bezel and it's good to go. It will be mounted through the back with a 3/4" ply spreader to take any flex out of it. |
|
Deleted
Deleted Member
Posts: 0
|
Post by Deleted on Jan 6, 2018 18:11:52 GMT
It's alive!!
Vanguard growled into life and behaved well on her sea trials, I've got to very slightly retard the injector pump as there is a tiny bit of diesel knock. Bit annoying as I went to great lengths to make sure it was back exactly on it's marks.
Sounded sweet as a nut with no load, the first 15 minutes of running was watching everything like a hawk for leaks (oil, fuel and raw water) - of which there were none 👍
It was too hot to cuddle the pump after a pleasant if cold chug up and down the river a couple of times so we decided to leave it till next visit.
There were other things to attend to anyway.
We did a bit more battery recabling, replaced the Lucas ignition switch and tidy some of the spaghetti wiring that had growd over the years.
After that it was remove the canopy as it needs some repairs, fair bit of farting about getting the canopy frames tied together so a tarpaulin could by secured to keep the weather off the cockpit while the canopy is worked on.
Early night tonight, I'm knackered!
|
|
|
|
Post by phil70 on Jan 6, 2018 18:30:26 GMT
Gazza what sort of condition is your P bracket in?
I lost some bolts out of the P bracket in my dayboat and was lucky not to chew a hole in the bottom
Had to get her out and replace bolts and glass them in
Phil
|
|
Deleted
Deleted Member
Posts: 0
|
Post by Deleted on Jan 6, 2018 20:28:10 GMT
Gazza what sort of condition is your P bracket in? I lost some bolts out of the P bracket in my dayboat and was lucky not to chew a hole in the bottom Had to get her out and replace bolts and glass them in Phil Fairlights P bracket had the bolts replaced (just checked it was bloody three years ago!) when I did the skeg, they were mild steel and well shot - about ready for failing, that was a fun job! I replaced them with stainless bolts but had a little forward thinking while doing it. I obviously had to grind away the glass capping to get at them, before I glassed over them and while the heads were exposed I welded a strap across each pair of bolts so they are now captive and can't spin. Should the P bracket need any attention everything can be done from underneath. I haven't seen dad's Vanguard out of the water, but the pictures I've seen of the sterngear look ok - taken last year when he had her moved by road from Oulton Broad to Littleport. Plan is to have her out next year so I can give her a good going over. A mate of mine sheared his Mk2 E27 P bracket, had to have a new one cast at Clements marine 😰😰😰🔨🔨🔨🔨 |
|
Deleted
Deleted Member
Posts: 0
|
Post by Deleted on Jan 10, 2018 18:58:34 GMT
While all the attention has been on Northern Star and Vanguard poor old Fairlight has taken a bit of a back seat. It hasn't helped the Nene has been on flood since 27th December! I managed to grab an hour on Sunday to remove the heater plugs so they could be cleaned and the ports in the Ricardo chambers decarbinised with a long series drill The plugs were cleaned and checked at work - after a 1000 hours the Champion plugs are all showing a healthy 1.8 ohms. I finally got round to fitting a bus bar off a Ford Escort diesel in place of the crappy crimped things I made year's ago. Refitted the lot today and she starts no end better. It's a 250 hour service according to the book, I haven't done it in 1000! I'd say 500 Hours check was more realistic as the build of carbon up wasn't too bad. I also fitted two new idiot lights on the dash. The battery warning light was 2w and didn't load the alternator too much when starting requiring a blip of throttle to spring it into Life. It now has a 4w lamp that has cured that. I also fitted a matching heater plug warning lamp, not essential as you can see the load on the ammeter and volt meter, it does give a clearer indication all is well - I wired it into the load side of the heater plug fuse so if there's a problem the lamp won't light.  River permitting (we are off SSA at present) we may blow the cobwebs out on Saturday and grab a pint at the King's Head 🍻🍻👍🔨🔨🔨😎🚢 |
|
Deleted
Deleted Member
Posts: 0
|
Post by Deleted on Jan 16, 2018 18:34:35 GMT
Work is advancing nicely on Northern Star's heads. A standard fenland set up of macerator, diverter valve, holding tank and heads seacock. As much wood from the old cockpit floor and lockers as could be was reused. Needs painting and the toilet plumbing in now. 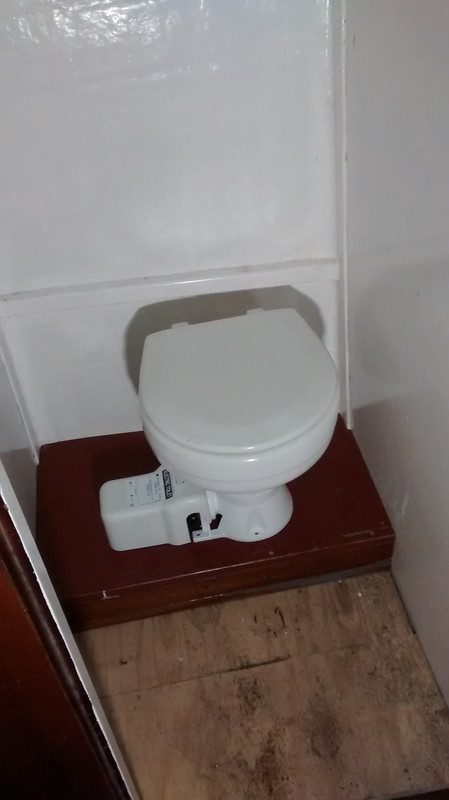 The toilet itself is a standard Jabsco manual toilet converted with a macerator kit from Pacer Marine. The toilet was a clean used donation from another club member who had removed it in favour of a thunderbox! The conversion kit was around £130 on eBay. |
|