Deleted
Deleted Member
Posts: 0
|
Post by Deleted on Mar 2, 2019 18:35:28 GMT
For r the past few days I've been doing a major shed tidy, empty it out, sort, put up new shelves, mend shed and workbench, put stuff back. Needed to do it in dry weather to leave stuff out. Given some of the "twicer" tools to friends. Also had to put a new thermostat on the car and then the spark plug bar failed yesterday. Perfect timing as ever, I had a free lunch/meeting at dinnertime. Neighbour took me to scrapyard for part, dropped me off for free lunch. I did stand on my hind legs and earn my dinner, short speech about funding for us at Rochdale Feelgood festival, then tucked in to Meat and potato pie with red cabbage - a big crusty corner piece. Seconds was cheese and onion pie and red cabbage. Pudding a piece of chocolate cake. Fixed car on returning home, cadged a lift off a friend who I was giving tools to. Car now working, shed nearly done. I did my shed last week - poor old faffer will soon be the lucky recipient of sone used Yamaha bits I unearthed 👍🙈 |
|
Deleted
Deleted Member
Posts: 0
|
Post by Deleted on Mar 2, 2019 18:52:00 GMT
So today was a sorting out day with mouse at Littleport. I was there before him but had enough to get my teeth into. Proper filtration for the 4.108m was the first job. 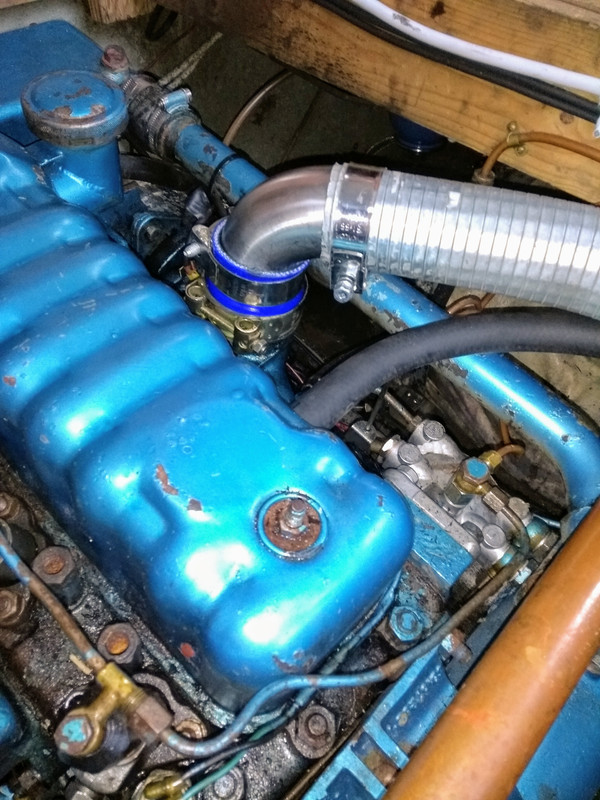 Trim the silicone hose reducer to length, fit elbow and flexible exhaust hose. Mount catch can and air filter assembly. Pipe up with proper oil resistant hose. 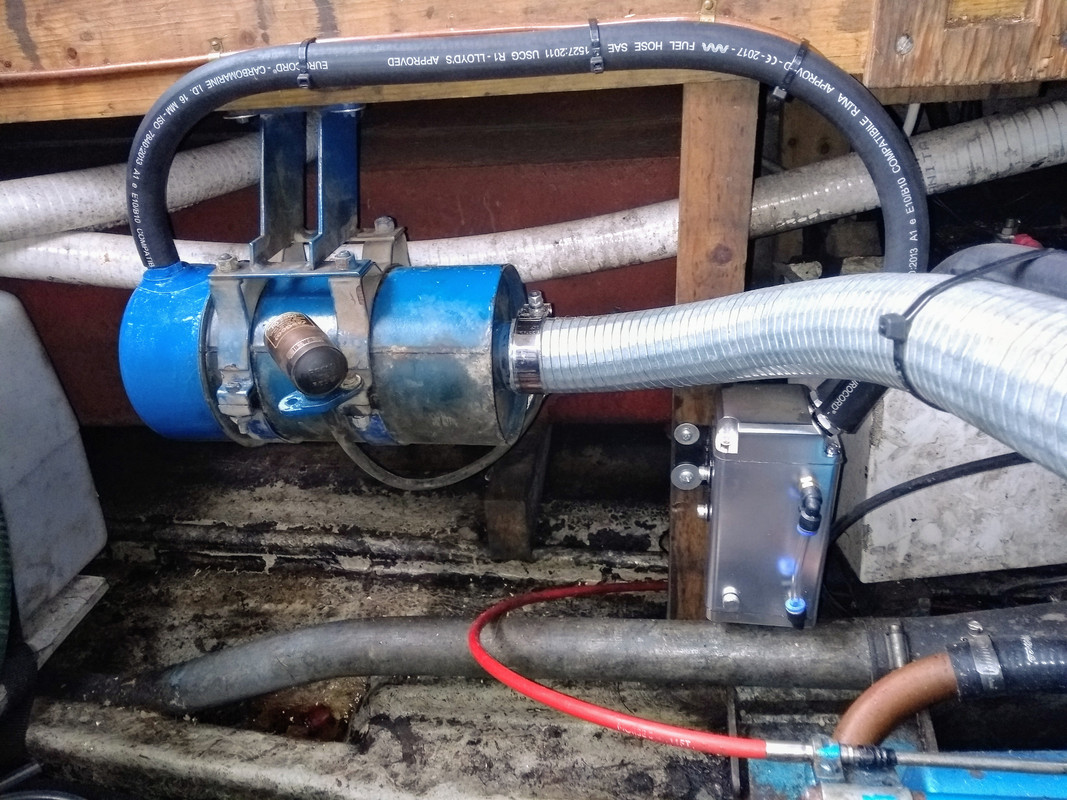 Clip the breather hose to the flexible duct and job is a good un.  No photos for the following I mounted the fuel pump for the Webasto. Mounted and piped up a remote stern gland greaser. Recommissioned the domestic water system. After that we went up river to Ely for a couple of beers in the excellent Drayman followed by a bit of stocking up with beer and bog roll and other odds and ends atAldi's in advance of heading back onto the Nene at Easter. Last couple of jobs on the run back to Littleport:- Cleaned the burner and ignitor on the gas side of the fridge. Take some accurate measurements of the engine coolant - the gauge is wildly inaccurate, the old girl purrs along just nice at 76°c odd We also measured the temperature of the exhaust elbow ready for me to setup the £6 alarms. The outside temperature of the elbow when run near flat out gets to a whisker under 30°c useful info that means the alarm will be set up ready to rock at work and will only take a short while to install. Good busy day. Cheers mouse |
|
Deleted
Deleted Member
Posts: 0
|
Post by Deleted on Mar 7, 2019 19:48:27 GMT
dogless a small update as promised One of the jobs I’ve been procrastinating on is the exhaust alarm for Fairlight - I had half thought about hiding the controller in the electrical cabinet and just using it to set the led/buzzer off - a change of heart was had when I decided I needed a multi tool to munch a hole in mouse Vanguard for to fit his heater matrix. What better place to test it than Fairlight’s helm bulkhead with a steering wheel in the way?  I hacked this out of a bit of composite board freehand with the jigsaw- accuracy was not too high on the list for reasons which will become clear!  The template was screwed inside the bulkhead blind at a best guess it’s level sort of job, I was a little out as can be seen from the above photo! The multi tool absolutely pissed through the bulkhead though - well impressed www.homebase.co.uk/ozito-300w-multi-function-tool_p389273It came out well in a group test and wasn’t a lot of money, plenty of attachments too, it will eat the heater matrix job and will be put into service to refresh the first two rows of grout in the en-suite at home too 👍🔨🔨🔨👌 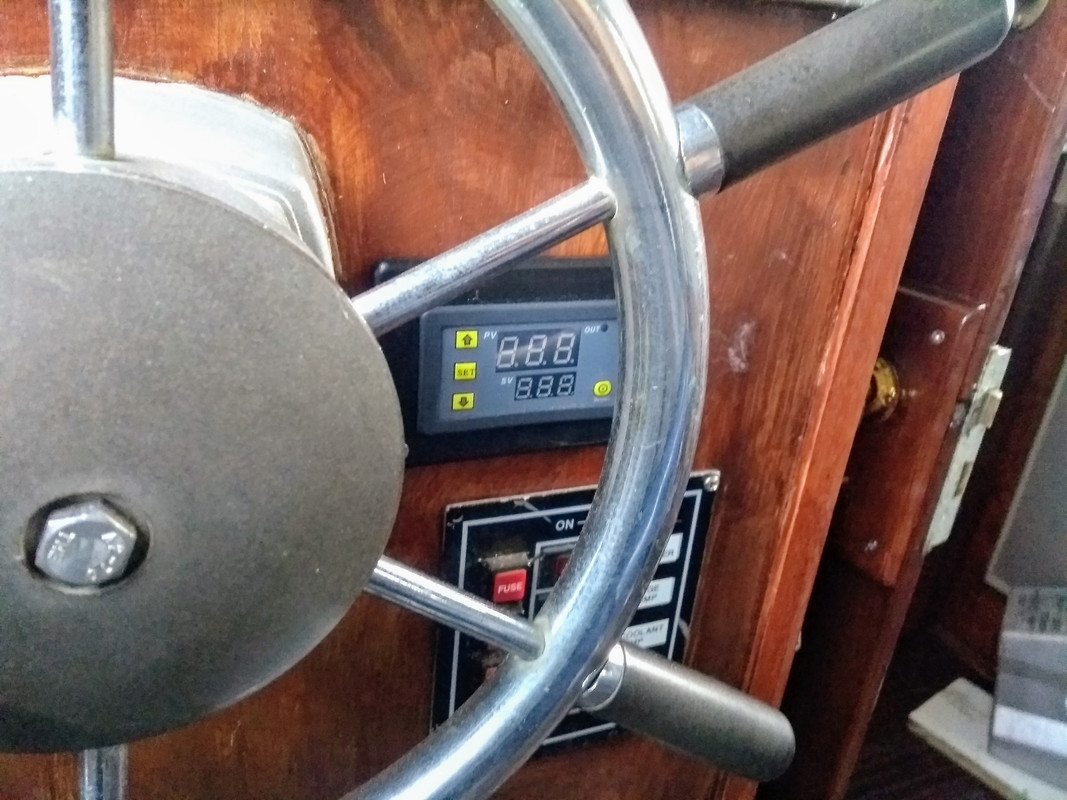 The controller in place and level - accuracy wasn’t important as the lid it is let into hides a bit of sin and error - that picture shows it is level, it also shows I still haven’t replaced the M8 hex head set screw with a button head, the staining and varnishing isn’t complete and I have one inaccessible screw to fit to the switch panel 🤭☝️🤦🏼♂️
|
|
Deleted
Deleted Member
Posts: 0
|
Post by Deleted on Mar 7, 2019 20:17:00 GMT
Here are the funny sort of jobs I get now and again mouse assures me he was much taller in his youth 🧐 - a fair few years under my mothers thumb and the onset of oldish age means he needs a bit of an aid getting on and off the high sided Elysian he had got hold of a quality Alddis step but spoiled it by screwing some weetabix based chipboard to it to stop the legs splaying out under his weight. it now has a proper bit of non rotting composite board screwed to it - nicely shaped too 👍👌🔨🔨🍻  |
|
|
|
Post by JohnV on Mar 7, 2019 22:51:06 GMT
I bought an el cheapo multitool from Aldi (Lidl ?) and I have found it invaluable .......but Lord they're noisy (or at least mine is) have found a blunt blade is great for removing old Sikoflex |
|
|
|
Post by mouse on Mar 7, 2019 23:24:48 GMT
I bought an el cheapo multitool from Aldi (Lidl ?) and I have found it invaluable .......but Lord they're noisy (or at least mine is) have found a blunt blade is great for removing old Sikoflex Gazza says the Homebase jobbie I picked up for him is noisy too. Must come with the territory. That said, it is fairly quiet over here in Lewstuff! |
|
|
|
Post by mouse on Mar 7, 2019 23:30:01 GMT
Here are the funny sort of jobs I get now and again mouse assures me he was much taller in his youth 🧐 - a fair few years under my mothers thumb and the onset of oldish age means he needs a bit of an aid getting on and off the high sided Elysian he had got hold of a quality Alddis step but spoiled it by screwing some weetabix based chipboard to it to stop the legs splaying out under his weight. it now has a proper bit of non rotting composite board screwed to it - nicely shaped too 👍👌🔨🔨🍻 The Weetabix wood base was nicely shaped too, but when the works Chippie does it for you, one just says "thank you very much, what do you smoke/drink?" |
|
Deleted
Deleted Member
Posts: 0
|
Post by Deleted on Mar 8, 2019 7:00:12 GMT
I bought an el cheapo multitool from Aldi (Lidl ?) and I have found it invaluable .......but Lord they're noisy (or at least mine is) have found a blunt blade is great for removing old Sikoflex I bought an el cheapo multitool from Aldi (Lidl ?) and I have found it invaluable .......but Lord they're noisy (or at least mine is) have found a blunt blade is great for removing old Sikoflex Gazza says the Homebase jobbie I picked up for him is noisy too. Must come with the territory. That said, it is fairly quiet over here in Lewstuff! As mouse says - bloody noisy! I was working in the cramped confines of the heads so had my head fairly close to the damn thing 😠 I've put some ear plugs in the box now! |
|
Deleted
Deleted Member
Posts: 0
|
Post by Deleted on Mar 18, 2019 12:59:16 GMT
This job came about following the flywheel swap:- a crusty weepy looking heat exchanger was spotted when I removed it to lift the back of the engine - the underside isn’t really visible insitu - I hadn’t seen the underside for 9 years and as we don’t run in salty or brackish water there is no real need to pull the HX to bits annually. A loss of coolant is good enough indicator for me. So it was off to work with the HX and a small worry it may be an utter bastard to strip - as is often the case! I turned a gash bit of aluminium to make a large drift, cut an 83mm hole in a bit of board to drive the tube stack through and kept my fingers crossed 🤞 I needn’t have bothered - the seals came out a piece of cake 🍰😜🍻🍾🔨🔨🔨👍 The stack followed suit with only a minimal amount of cleaning the scale away on the raw water side; some days you’re the dog, some days you’re the rabbit; thank heavens I was the dog today 😊  The body will get cleaned and treated to a lick of paint - it and the stack are currently luxuriating in a tub of central heating descaler. I’ve got to rod out the tubes with some pipe brushes too - immensely boring job but well worth doing while it is all in bits. A pair of seals and we are good to go ✊👌 |
|
Deleted
Deleted Member
Posts: 0
|
Post by Deleted on Mar 20, 2019 20:42:47 GMT
New seals for old  The lump of neoprene in the middle is the tip of an impeller blade that had taken up residence in one of the tubestack cores. Many happy hours spent rodding the cores with a tube brush, a short while with a paint brush (oddly Bentley still haven’t head hunted me 🧐) and it’s ready to go back on.  I will nip the draw bolt up tight when it’s connected to the raw water pump insitu. I wlll also do a separate write up on the life and times of a heat exchanger, I’ve a FH200 that is getting some love that will make up for the lack of pictures of the refurbished EH220 you see in this thread. |
|
|
|
Post by JohnV on Jun 3, 2019 15:09:56 GMT
Well time for a progress report on the ongoing trials and tribulations of a yoghurt pot owner  I have been back in Benfleet for a couple of weeks working on Shapell, my 25.5 ft Ormelite narrow beam cruiser. Since my 2016 summer on the Gt Ouse she has been sitting on blocks in a carpark at the boatyard in Benfleet (my God .... is it really that long) She received some slight hull damage from the trailer when she was towed back, which needed repair and the raw water cooling system had been driving me up the wall ever since I first bought her. It seemed up block at the first sight of weed. Before the 2016 cruise I had the filter mesh off the bottom of the boat and filed the miniscule slots out to about double the size but to no avail, it still blocked and was a right palaver to clear. A more drastic solution was called for. My first job on getting back was to clean the green and black algae that had grown on the roof. The gel coat is finely moulded in a herringbone non slip surface so it wasn't a simple wash off. (it also had to be by hand as the nearest tap is a couple of hundred yards away and the pressure is miniscule so bucket fulls were needed) Every bit of the cabin and deck had to be scrubbed with a stiff scrubbing brush and loads of every type of cleaner I thought might help. This on it's own took me 3.5 days !!! the last half day was grinding out the damage in the bottom and getting the first layer on. 5th day was spent sanding down the top section of the hull and getting the second layer on the damage and getting an undercoat on the hull. There was a breeze the next day so it was survivable inside to start on the water system (the Southeast has been enjoying wall to wall sunshine for the last couple of weeks  ) The inlet was a Stuart Turner inlet valve, I suspect it was left over from the original petrol engine installation and had been just re-used, it only had 1/2" bore pipe fittings and the same as the through hull diameter. When I took it apart I found that the slot opening for the water when it was fully open was only 1/2" by 1/4" .... no wonder it blocked so easily humph !!! sorry got to go ..... I will finish this post when I can ..... I'm blowed if I am going to lose all this typing  |
|
Deleted
Deleted Member
Posts: 0
|
Post by Deleted on Jun 3, 2019 18:21:40 GMT
Well time for a progress report on the ongoing trials and tribulations of a yoghurt pot owner I have been back in Benfleet for a couple of weeks working on Shapell, my 25.5 ft Ormelite narrow beam cruiser. Since my 2016 summer on the Gt Ouse she has been sitting on blocks in a carpark at the boatyard in Benfleet (my God .... is it really that long) She received some slight hull damage from the trailer when she was towed back, which needed repair and the raw water cooling system had been driving me up the wall ever since I first bought her. It seemed up block at the first sight of weed. Before the 2016 cruise I had the filter mesh off the bottom of the boat and filed the miniscule slots out to about double the size but to no avail, it still blocked and was a right palaver to clear. A more drastic solution was called for. My first job on getting back was to clean the green and black algae that had grown on the roof. The gel coat is finely moulded in a herringbone non slip surface so it wasn't a simple wash off. (it also had to be by hand as the nearest tap is a couple of hundred yards away and the pressure is miniscule so bucket fulls were needed) Every bit of the cabin and deck had to be scrubbed with a stiff scrubbing brush and loads of every type of cleaner I thought might help. This on it's own took me 3.5 days !!! the last half day was grinding out the damage in the bottom and getting the first layer on. 5th day was spent sanding down the top section of the hull and getting the second layer on the damage and getting an undercoat on the hull. There was a breeze the next day so it was survivable inside to start on the water system (the Southeast has been enjoying wall to wall sunshine for the last couple of weeks ) The inlet was a Stuart Turner inlet valve, I suspect it was left over from the original petrol engine installation and had been just re-used, it only had 1/2" bore pipe fittings and the same as the through hull diameter. When I took it apart I found that the slot opening for the water when it was fully open was only 1/2" by 1/4" .... no wonder it blocked so easily humph !!! sorry got to go ..... I will finish this post when I can ..... I'm blowed if I am going to lose all this typing With Northern Star As a short term measure we cut the intake grill off the Stuart Turner seacock with a slitting disc, this at least meant it could flow a greater amount of water and was easier to rod out should it become blocked. Final answer was to fit one of these. www.asap-supplies.com/raw-water-intake-strainer-hull-mounted-402024New skin fitting bedded in with a ply backing ring, 3/4” DZR ball valve then the strainer - it means you can rod it out easily if blocked, it gives your pump an easier time if the velocity of the raw water is slower going through larger bore pipe work as well. Added bonus is you can easily run some antifreeze through the system if she needs winterising afloat. The old stuart Turner seacock was reused for the sea toilet flush, strictly speaking it should have been a 3/4” seacock but it flows enough water to flush without problem so is being left as it is. |
|
Deleted
Deleted Member
Posts: 0
|
Post by Deleted on Jun 3, 2019 18:42:31 GMT
With the setup described above you can tackle conditions like this with relative ease  Northern Star strainer - thinking about it I have a feeling this may actually have been a 1” strainer - it is 18 months since I fitted it!  As long as the strainer is accessible and the waterline below cap level the cap can be left off without fear of inundating the bilges- a regular poke with a bit of 15mm capped copper tube and job is a good un - piloting Vanguard with a very similar setup mouse managed the Old West soup ok on his Jack Jones 👍 More than can be said for those with remote strainers, the hoses from the seacock to strainer block making clearing them an utter nightmare. I wouldn’t consider any setup other than this on any GRP cruiser raw water system |
|
|
|
Post by JohnV on Jun 3, 2019 19:47:40 GMT
To continue (by the way, thanks Gazza but went a slightly different way) The whole way that they had done the inlet was a bodge, the Stuart Turner inlet was obviously from the petrol installation that they had just re-used running the outlet from that through a metrer length of pipe to a Vetus strainer mounted in front of the engine (the water inlet is by the gearbox) it then runs back under the engine in a big loop before eventually going to the water pump. I removed the original input and fitted a bronze 3/4" skin fitting with a 3/4" DZR lever valve on top then a hose tail and 5" length of heater hose joining to the vetus strainer input mounted immediately above. The top of the filter housing is now comfortably above the waterline and you can see straight down through the hull so rodding out any blockage will be easy peasy and it's a damn sight easier to get to than it was. Removing the ridiculous routing of the pipework (which incidentally had several completely unnecessary joins !!!) enabled the tidying up of some of the electric cables that had just been cable tied to whatever was nearest. The next thing that struck me was the enormous amount of exhaust hose that seemed to be going every which way. ( also complete with several unnecessary joins ) Getting the floor up in the cabinet above the exhaust system was a nightmare as lots of gas piping, hot and cold water piping, inlet and exhaust for the Propex heater and the wiring for that and for the hotwater system all went through there like a spider's web. After cutting the bit of wood in half and with judicious levering I managed to remove it and for the first time got a look into that section. As was becoming obvious, it was another bodge by lazy engineers when they changed the engine (I always thought it was a crap engine installation but it worked and I didn't want to do that much work so I didn't look too closely) There were two waterlock exhaust systems installed, one was a standard Vetus watertrap exhaust, obviously part of the installation kit for the engine. the other was a brass and copper affair that was obviously original install. Because of how the ins and outs were arranged, there was about 3 metres of exhaust hose in huge loops filling most of the compartment. Lying with my head inside the section with a torch I could see that the metal section was joined with a very tatty bit of rubber hose to the skin fitting, and joy upon joy, the jubilee clips were fitted so that the screwdriver slots were on the underside and totally inaccessible. I decided that that was probably why they hadn't taken it out !!! I managed to get a junior hacksaw to it and cut the clips off and removed the original silencer (straight through, no baffles or absorption but offset in/out to give a water baffle) this meant that now the outlet from the vetus unit lined up with the skin fitting ...... the only problem was that the skin fitting was imperial and about 42mm and the exhaust hose was 40mm and would not go on (it didn't help that you could only reach it at full stretch and couldn't get any real pressure on it) A quick visit to my friendly chandler just across the creek produced a short length of imperial hose (found at the bottom of the oddments stack) and an adaptor, imperial to 40mm (price ... call it forget it ) armed with my new parts I soon had it installed with the Vetus unit now fixed down as opposed to just bouncing around on the pipework as previous  The hoses now look a lot neater, not perfect but just a heck of a lot better. I need to make a steel bracket to support the vetus filter so that there is no load put on the rubber pipe from the input and I also need to make a new floor for the cupboard in two sections for ease of removal plus add sound proofing to the underside. I will make that when back in Yorkshire in a couple of days I will be visiting the boat again tomorrow so will take photos of the work so far Other jobs that have been discovered during this work 1) the engine is not aligned properly with the prop shaft ..... you don't need a feeler gauge to check the angle on the flexible coupling you can bloody see the difference
2) the cause of an annoying knock and vibration you get at tickover, that I had so far been unable to find became visible with the removal of the unnecessary pipework .... one of the engine brackets is only a mm or so from one of the supporting legs for the kitchen sink, when revving the torque keeps it clear but at tickover it just knocks against it. As I said, I always suspected the installation was poor ...... but it is worse than that ... it absolutely pants !!! |
|
|
|
Post by patty on Jun 3, 2019 22:31:30 GMT
Theres a lot of hard work going on...I feel quite tired reading about it..
Bin told twice in 2 days that my front hedge needs cutting...sigh...
Tomorrow..
|
|


 )
)


