|
|
Post by bargemast on Sept 22, 2017 14:57:29 GMT
I was never pushed or helped by my dad with anything technical, he was pretty useless with his hands (apart from hitting me) if he had to hammer a nail or a hook in a wall, he would hit his fingers and then instead of having fixed the hook, the whole wall would be damaged.
But I don't really blame my old man, he had a very hard life as a youngster, he was born in 1907 7 years before WW1, and lost his dad when he was 5, so never had any help with anything from his dad, as he hardly knew the guy, and then his mum died during the war, so not a very lucky childhood I would say.
Myself I've always been interested in technical stuff, and earned my pocket money by helping the bicycle repair shop in our street from the age of 10, when I was 12 a neigbour had bought an old moped, that often didn't want to start, and while only being about 12, I cleaned the carburettor, changed the sparkplug and decoked the exhaust, and the old heap was running nicely again.
My neighbour had given me a spare key to his old heap, and I was racing it in our neighbourhood, hiding away for the police that some other neighbours regulary called when I was racing around (nasty creatures !).
A bit later I had a real passion or cars, and one of my friends father had a hire car business with more maintenance and repair work then he could handle, so after school I used to go and work there, which didn't please my parents, because I never did my homework.
The worst thing that my father had to deal with was having to come to my school when I was 15, as I didn't fancy getting soaking wet in the pouring rain while going to school on my bicycle that I'd taken a 1959 Chevrolet Bel-Air (the one with the big wings) from the hire car garage, as it wasn't needed, and my friends father didn't care, he let me do whatever I wanted.
The director of my school was a prick, nobody liked him, he had a 1950 Ford Zephir, and I'd parked the Chevy next to his car, and nobody had seen me arriving in it, apart from some classmates, but when he found out my dad had to come to be shouted at for not having any control over me, and he had to drive back in the Chevy, something he quite enjoyed without saying it.
It's only too bad that my parents didn't live very long to see more of my bad behaviour, but I would really have loved to be able to do something for them, just to make up for the hard times I gave them.
Peter.
|
|
|
|
Post by JohnV on Sept 23, 2017 21:57:17 GMT
returning to the main core of this thread, I finally got cracking on installing the second generator in my engine room. It was one I acquired several years ago and had stripped it down on deck (faulty alternator). It has a Yanmar engine that has barely run in, I was planning on getting the alternator rewound but this was just before my wife became ill ...... which was then followed by me becoming ill ...... so it sat part stripped under a progressively more tattered tarp for nearly 4 years. While I was in drydock I decided that I needed to get cracking again, so I got the welder (as he was already working in the engine room) to build a bed for it and we craned in the bottom half of the case together with the engine into place. Rather than rewinding I found a replacement alternator on ebay at a very competitive price. Thursday I fabricated the flexible mounts to between the chassis and the bed ........ and then ripped them out and made them again .... better ones  . Friday I fitted the new alternator ..... or tried to ...... obviously when they build these things they assemble engine and alternator together and drop the whole thing into the case as one. When I removed the old alternator I took it to bits and removed each part separately, so I took the new alternator to pieces and started to assemble it in situ. Taking it apart was easy peasy ...... however re-assembly was a different matter (ignoring mounting the armature on the taper before fitting the front cover) ...... it took bloody ages and ages a lot of swearing and several tea breaks ....... to be honest by the time I had it together I was knackered  This morning I started early determined to get it finished. I put all the panels together and reconnected the control panel and the exhaust, fitted the battery, added diesel and being an optimistic kind of person,turned the key ..... it ground over for a bit ...... zilch ..... after considerable bleeding and trying, it eventually burst into life. Clouds of smoke that eventually cleared away and it sounded sweet ........ however there was no electrical output. I opened up the inspection plates and checked the connections. (I was wondering if it needed flashing but I couldn't remember how you did it with an alternator with no slip rings) Then I noticed that one of the push fit connectors on the capacitor had broken off (not new) I guess I must have broken it while struggling with the re-assembly.  This pissed me off somewhat and then I had a bright idea ...... I pinched the one out of the other generator (same value) and fitted it ...... Eureka !!! I'll get another one on Monday morning ....... all that remains to do is to install a generator selection switch an run the cable properly  |
|
|
|
Post by peterboat on Sept 24, 2017 8:22:11 GMT
Oh John great pain or what? Do you not remember me telling you I repaired gennies in the ARMY................
|
|
|
|
Post by bargemast on Sept 24, 2017 10:55:29 GMT
returning to the main core of this thread, I finally got cracking on installing the second generator in my engine room. It was one I acquired several years ago and had stripped it down on deck (faulty alternator). It has a Yanmar engine that has barely run in, I was planning on getting the alternator rewound but this was just before my wife became ill ...... which was then followed by me becoming ill ...... so it sat part stripped under a progressively more tattered tarp for nearly 4 years. While I was in drydock I decided that I needed to get cracking again, so I got the welder (as he was already working in the engine room) to build a bed for it and we craned in the bottom half of the case together with the engine into place. Rather than rewinding I found a replacement alternator on ebay at a very competitive price. Thursday I fabricated the flexible mounts to between the chassis and the bed ........ and then ripped them out and made them again .... better ones . Friday I fitted the new alternator ..... or tried to ...... obviously when they build these things they assemble engine and alternator together and drop the whole thing into the case as one. When I removed the old alternator I took it to bits and removed each part separately, so I took the new alternator to pieces and started to assemble it in situ. Taking it apart was easy peasy ...... however re-assembly was a different matter (ignoring mounting the armature on the taper before fitting the front cover) ...... it took bloody ages and ages a lot of swearing and several tea breaks ....... to be honest by the time I had it together I was knackered This morning I started early determined to get it finished. I put all the panels together and reconnected the control panel and the exhaust, fitted the battery, added diesel and being an optimistic kind of person,turned the key ..... it ground over for a bit ...... zilch ..... after considerable bleeding and trying, it eventually burst into life. Clouds of smoke that eventually cleared away and it sounded sweet ........ however there was no electrical output. I opened up the inspection plates and checked the connections. (I was wondering if it needed flashing but I couldn't remember how you did it with an alternator with no slip rings) Then I noticed that one of the push fit connectors on the capacitor had broken off (not new) I guess I must have broken it while struggling with the re-assembly. This pissed me off somewhat and then I had a bright idea ...... I pinched the one out of the other generator (same value) and fitted it ...... Eureka !!! I'll get another one on Monday morning ....... all that remains to do is to install a generator selection switch an run the cable properly Good work John, if you would have been my son, I would have been very proud to have a son like you, it's a proof of your will to succeed in what you want to do, and you got there in the end. I am sure that you were very happy when the machine worked in the end, and if you wouldn't have been so knackered you may even done a victory dance on the deck. You are happy now, and I am happy that you are happy, and hope that that happiness will last for a long long time. Peter. |
|
|
|
Post by bargemast on Sept 24, 2017 11:00:50 GMT
Oh John great pain or what? Do you not remember me telling you I repaired gennies in the ARMY................ Maybe John remembered what you told him, but there's so much more satisfaction if you're able to sort out your problems yourself. Still it's always nice to know in the back of your head that if you can't sort it out yourself, there maybe someone with the knowledge that is willing to help you out of your missery. Peter. |
|
Deleted
Deleted Member
Posts: 0
|
Post by Deleted on Sept 27, 2017 13:29:22 GMT
The bits for Northern Star's new rudder are coming together. 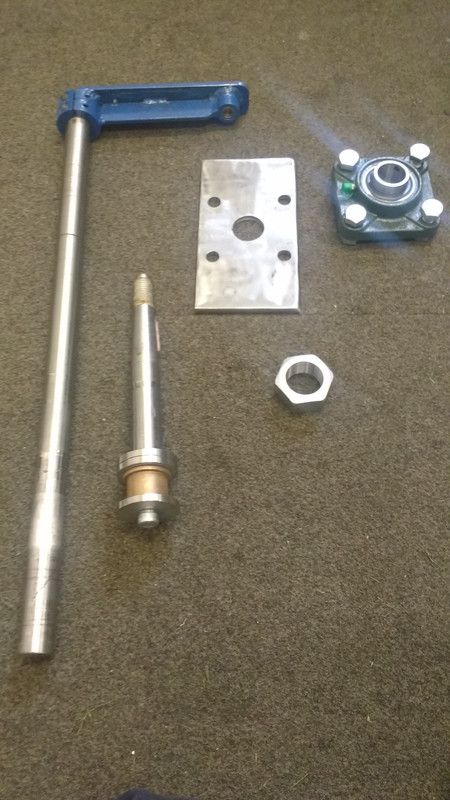 The steering is now seized solid, this means we can remove the quadrant and cables giving me space to dream up a bracket to take the flange bearing, steering cable and rudder stops mounted off the existing rudder stop post without causing any more issues than we all ready have! This will give us a big head-start as it can all be done afloat. I'm going to have a bit of a measure up this afternoon, a picture will make it a bit clearer for everyone how the bracket will be mounted - John wont need a picture as he already knows what it looks like! I'm not keen on the bush in the skeg doing all the work along with the rudder gland providing the only support at the top of the rudder stock hence the addition of the flange bearing. I know it has been fine for 40+ years, but, it could be better engineered. I did the same thing to Fairlight when I replaced the sterngear for exactly the same reasons - the steering is sweet on that so I cant think of any reason why Northern Star should not receive the same treatment. The plan is to tow her around to the paint dock middle of October, fart about prettying her up, tow her back middle of November and then drag her out the water and lop the old rudder stock off with a 9" grinder after that its a simple matter of replacing part of the skeg with the new lower pivot, measuring up, cutting the blade and nailing the two part rudder stock (mainly due to not having a bit of bar quite long enough!) and blade together. |
|
Deleted
Deleted Member
Posts: 0
|
Post by Deleted on Sept 28, 2017 13:11:14 GMT
Here is what we currently have. 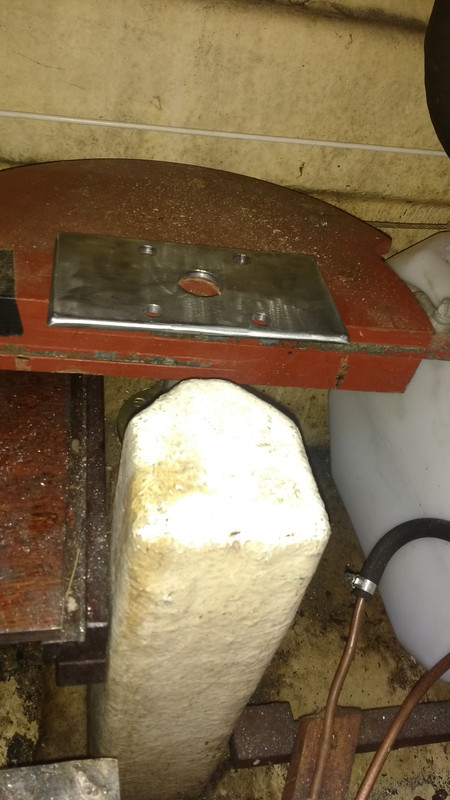 The new bracket will be hung from the rudder stop post and tied into the big strengthening rib running across the transom. Fag packet drawing to give an idea of how it will end up - I'd have been shot at Tech for that! but as it's for me and there is enough detail to get me started there is no need to sit in front of a drawing board or CAD software to cut 2 bits of angle! 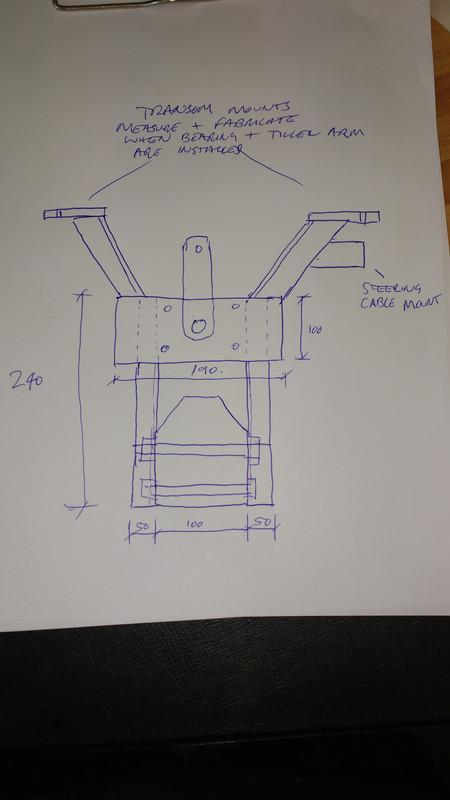 I've got to tack it all up in position, the rudder post is not square so the 2 x 240 x 50 x 50 x 6 angle will be clamped to the post, the bearing plate tacked to it then welded up in the safety of the workshop at the club. In the past I have had some odd looks from those that do know and tentative questioning by those that don't how you go about welding GRP! |
|
|
|
Post by Jim on Sept 29, 2017 17:25:59 GMT
Been to the boat this afternoon, fitted new 10mm wire to 4 battery bank, bought a proper ratchet crimper from screwfix £14, so all wires now the same length. Also fitted a 1500w pure sine inverter, as recommended by Nick. It's really just for when I need 240v, my Chromebook, toothbrush charging, drill batteries etc. Now that I've fitted a 130w solar and mppt controller I have enough power, just over 400 ah of batteries.
I've just ordered a battery auto top up bottle off tinternet so I can top them up without getting the batteries out from under the back deck. I remember them from bygone times but the auto shops don't sell them any more. Next job is a 12v socket near the back, for phone etc when traveling. I also need to run a separate feed for the radio, it's currently sharing feed to water pump, which causes the radio to cut out when it's running.
|
|
Deleted
Deleted Member
Posts: 0
|
Post by Deleted on Sept 29, 2017 19:22:23 GMT
Been to the boat this afternoon, fitted new 10mm wire to 4 battery bank, bought a proper ratchet crimper from screwfix £14, so all wires now the same length. Also fitted a 1500w pure sine inverter, as recommended by Nick. It's really just for when I need 240v, my Chromebook, toothbrush charging, drill batteries etc. Now that I've fitted a 130w solar and mppt controller I have enough power, just over 400 ah of batteries. I've just ordered a battery auto top up bottle off tinternet so I can top them up without getting the batteries out from under the back deck. I remember them from bygone times but the auto shops don't sell them any more. Next job is a 12v socket near the back, for phone etc when traveling. I also need to run a separate feed for the radio, it's currently sharing feed to water pump, which causes the radio to cut out when it's running. Good effort! While Northern Star is taking up my time I've done very little to ours, in fact, all I've managed this week is to clean the windows! |
|
Deleted
Deleted Member
Posts: 0
|
Post by Deleted on Oct 1, 2017 13:27:15 GMT
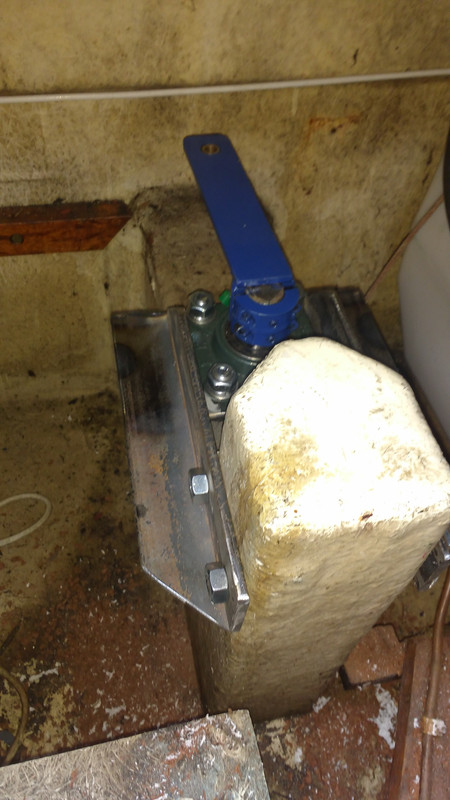 A bit dark but the plan view. 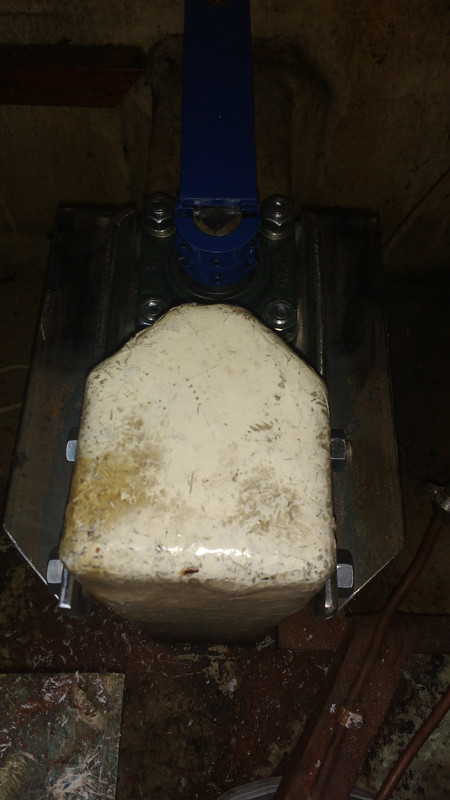 The post the bracket is mounted to is massively strong, a piece of 6" X 4" hardwood laminated over with GRP. No need to tie it in to the transom stringer at all. Next up is to install the steering cable and new helm unit. The plan for the steering cable is to run it from the helm under the deck boards over to the starboard side then on to the transom where the bracket will be mounted on the big stringer. It's a shorter route going straight from the helm along the port side but the fuel tank makes mounting the transom cable clamp difficult. The rudder stops will go in when the new rudder is installed as the rudder stock needs to be longer to reach the position that the transom cable mount will end up at. |
|
|
|
Post by larkboy on Oct 8, 2017 8:14:11 GMT
No boat work this weekend or last, but the one before that we did, finally, get the coach line panel done on the port side so the painting is now officially finished!👍 Friday after work it was take my workshop jack and some tools to my parents to do a quick oil and filters service on their mondeo, followed by a front pad change on the mx5, as they were an advisory on the mot. Unfortunately, somehow, doing my brake pads has put my back out so the weekend is being spent in considerable discomfort. I'm hoping some rest and my rather potent pain killers will allow me to work ok tomorrow.
|
|
|
|
Post by JohnV on Oct 8, 2017 11:18:17 GMT
Back pain is a pig. Hope you improve quickly ..... but don't push on too quick ..... it's easy to do fresh damage if you are on painkillers
|
|
Deleted
Deleted Member
Posts: 0
|
Post by Deleted on Oct 12, 2017 8:49:34 GMT
A bit of an update on northern Star, The helm unit is now sorted, the original helm is a shaft with a sprocket running a chain connected to the wire rope that operates the quadrant attached to the rudder stock. This shaft is mounted to the cabin bulkhead. Virtually every rotary cable helm unit I looked at is mounted from the front of the unit, I failed to find any that had a rear mount to a bulkhead option, so, there was only one thing for it, get creative!  A couple of bits of 50 x 50 x 6 angle back to back did the job as the helm needed standing off of the bulkhead to retain the original wheel position relative to the ply cover that hides the cable and some wiring that's in there. I picked up the rear cover screws and drilled and tapped the two angles so as to make helm replacement easier than if the bracket was of a welded construction. This also means the Angle that attaches to the bulkhead can be screwed and bonded in place so as to save disturbing the cabin lining. Helm needs greasing or replacing? undo 6 x M6 screws and away it comes leaving the bulkhead brackets in place. 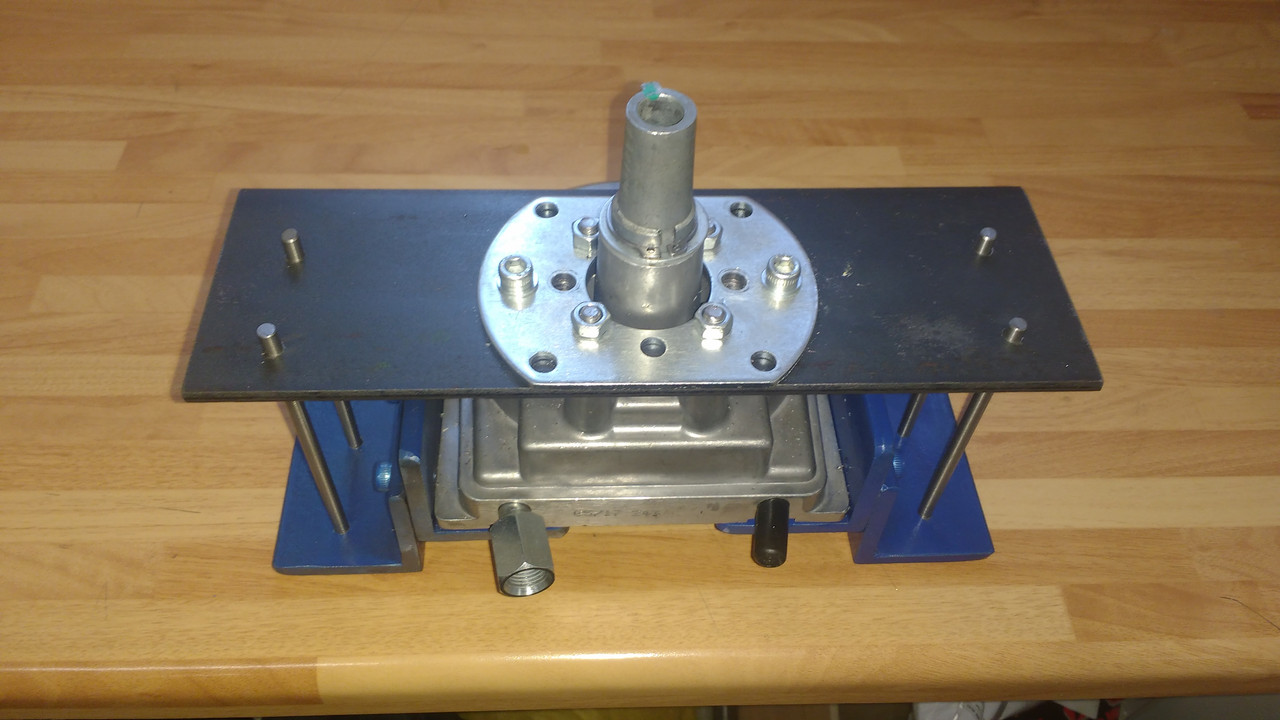 The unpainted plate attached to the helm is a drilling jig, the dowels were used to get the jig exactly lined up with the helm bracket. The original shaft will have it's centreline marked onto the bulkhead, the large hole in the centre of the drilling jig will be used to line it up exactly where the old shaft was, couple of pilot holes for the bulkhead bracket - Job Done! 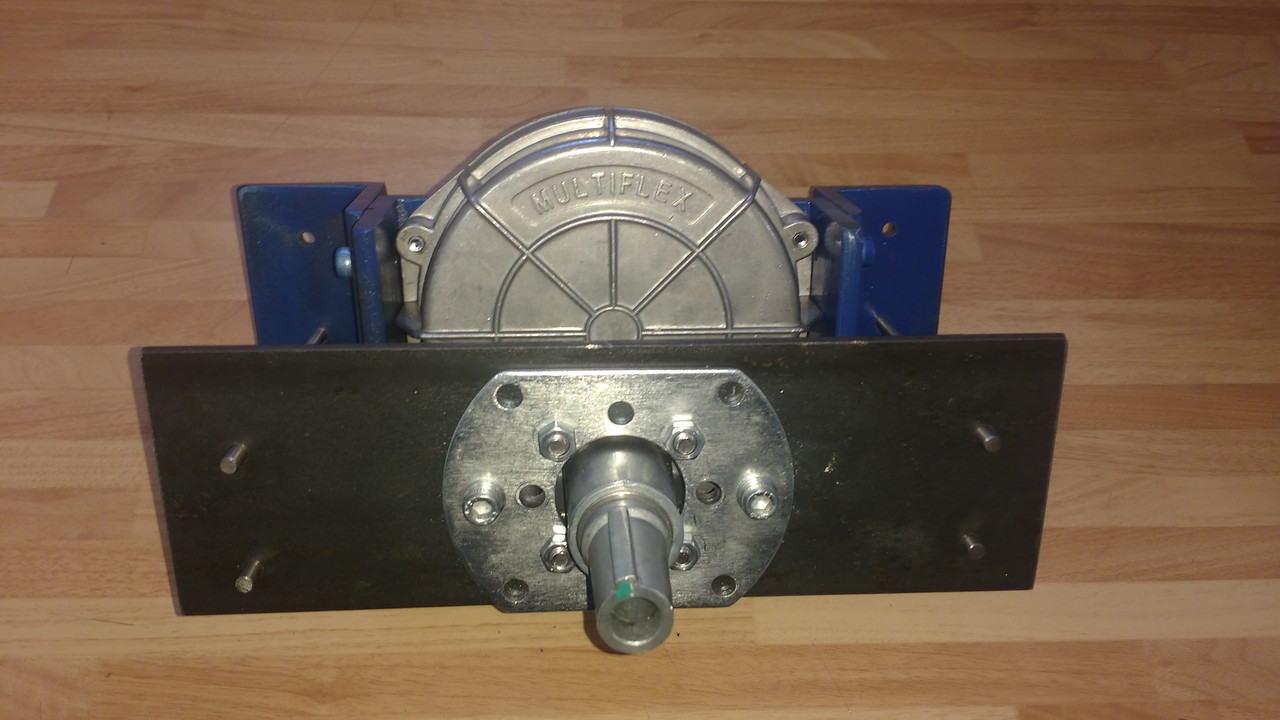 When it's all fitted externally it should not look too different to the original set up, although there is a high chance the original wheel will be replaced, it has a parallel shaft where the new unit has a 3/4" taper, I would make an insert for the wheel but I have a feeling my friend is going to take the chance to fit a new wheel, hopefully not a Momo racing car wheel! |
|
|
|
Post by JohnV on Oct 12, 2017 9:05:24 GMT
I like the standard Ormelite wheel, they are quite distinctive
|
|
Deleted
Deleted Member
Posts: 0
|
Post by Deleted on Oct 12, 2017 9:28:58 GMT
I like the standard Ormelite wheel, they are quite distinctive Me too, I can get hold of a 1" parallel to 3/4" taper hub adapter, a bit of work in the lathe and the wheel would fit the helm. I don't think my mate will be keen though. Fingers crossed he doesn't fit one of these horrid things either!  |
|


 .
.